Guide for Using the LEICA SP8 Microscope
- Load in dyes/fluorophores.
- Use the dye assistant to optimize signal and reduce crossover from other dyes. I generally prefer to use “line” and try to separate the dyes over several different tracks or detectors.
- Throughout imaging, always try to pick the z-position with the brightest/strongest signal. You will need to do this every time you move your x or y positions.
- Use a negative control (a slide that received the same staining procedure as the other slides, but did not receive PRIMARY antibodies) to set the maximum laser and detector settings. You must do this for each different objective you are using. You should not switch between 10x and 20x objectives and use the same laser and detector settings. Use these ranges as a general guide, but your primary goal is to (1) not see signal in the negative control and (2) avoid oversaturated signal:
- Smart Gain (detector) <= 200
- Laser <= 15 (647), 2-5 (Hoechst, 488, 555)
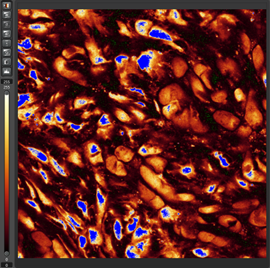
- To avoid oversaturated signal, quickly place your slides on the scope, look for positive signal in the regions of interest, and use the under/over-saturated view (shown below). Areas that appear in blue are oversaturated (see image below). You want to minimize this as much as possible. The signal in these regions is masked and therefore you will not be able to compare the relative strength of that signal to other areas in the sample. You will need to turn the laser and/or detector settings down to capture the full spectrum of signal and understand the relative strength of signal in the field of view. Continue to lower the laser/detector settings until your brightest sample has little to no blue regions. This step may be long, but it will ensure that brighter signals are not lost or masked.
- Regarding images you want to quantify, use the following settings:
- Three 63x (20x dry objective with 3.15 digital zoom) images in the region of interest. Try to be consistent across all samples.
- 1024 x 1024 pixel resolution at 200 hz
- Regarding tile scans:
- 512 x 512 pixel resolution at 600 hz
- For z-stack size use 2-3 micron interval steps
Other Tips
- If your goal is to quantify signal, you should ensure that all slides were processed, imaged, and manipulated (brightened, thresholded, etc.) in the same manner. If reviewers do not believe the signal is real in the images provided on the manuscript, you should be able to show them an image of the negative control that has received the same staining, image acquisition, and image processing as all of the other images.
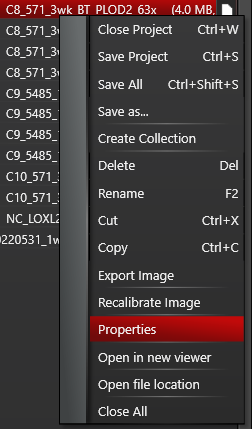
- Although you can reuse old settings, this will only load in certain properties, such as settings for the laser, detector, pinhole, etc. It will not give you important information, such as the pixel resolution, speed, etc. If you want to get this information and replicate how other pictures were previously captured, you can right-click on an image and click the “Properties” option.
For example, here will show you the resolution of the image.
 For example, below will show you the scan speed, objective used, and digital zoom.
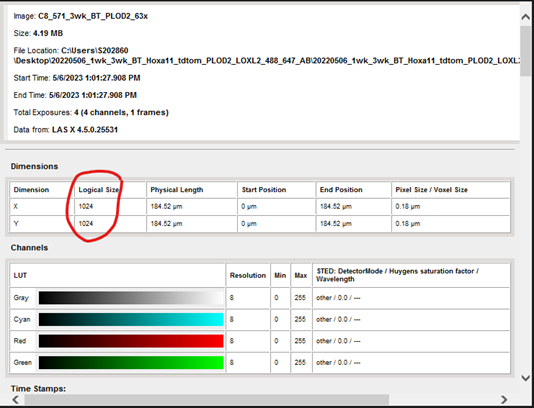 By using the properties tab, I can tell that this image was captured using the following settings that I would not be able to load in from a previous image: 1024x1024 pixels, 200 hz, 3.15 zoom on a 20x dry lens objective (63x image).
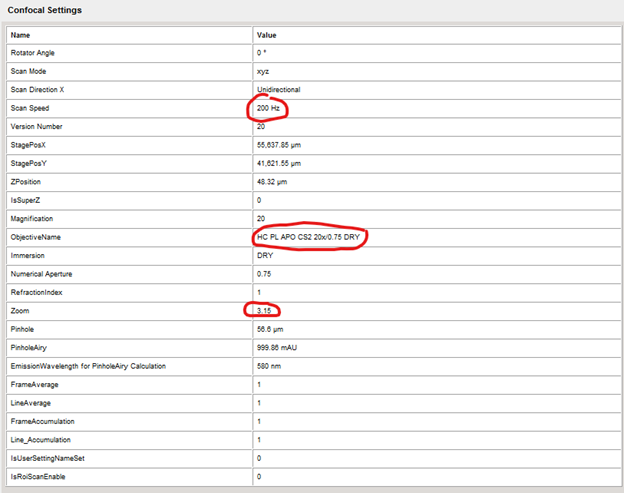
- When you start confocal for the first time, it may be difficult to tell whether signal is real or not. You should ask the following questions:
- Does the signal appear everywhere and is non-specific? Alternatively, is the signal overlapping with or surrounding Hoechst signal?
- Where do you expect to find signal for the antigen of interest? Is the protein a cell surface receptor or transcription factor?
- How does your imaging look to past stains from our lab or other publications with similar experiments?
- If you used more than one stain, do the stains have 1:1 overlap? Unless you are staining for the exact same protein, you should see areas where only one stain is present and not the other.